Bulk resize images. Why and how to resize
Perhaps, the problem of resizing is already familiar to you and you have read a lot concerning this subject. As you see, the Internet is full of articles about “Batch resize Photoshop option”, “How to resize a photo in a Photoshop”, etc. But what if you find Photoshop a little bit complicated to use and are looking for a Photoshop batch resize alternative, that is more easier solution in order to resize photo for Facebook, Instagram account or a simple blog. So, “How to resize an image on Mac in a simple way?” and the last but not the least “Why is it necessary to resize images?”. In the article below we will provide you with an information concerning bulk resizing and everything you should know about this issue.
After a short investigation, we came to a conclusion that the questions of resizing perplexe a lot of the users, as they do not understand the reasons for this as well as they are frightened of very complicated Maс resize images solutions. Nevertheless, even difficult things can be easier as it seemed at first sight. So, to know more about “What is resizing?” and “How to resize photos on Mac?” read below.

Understanding the term and the reasons for resizing photos
Under the term resizing we indicate a decrease or increase (although the latter is not welcomed) of the size of the photo in pixels. Usually, it is done proportionally and basically is used to create a "preview". In other words, a lightweight version of a photo for quick loading. Nevertheless, the reasons for bulk resize images cannot only be narrowed down to just a quick loading of the images. One can face such a necessity due to other different reasons. We have gathered the list of common reasons for the resizing of an image. Look at it:
- Very often we are faced with the task of creating and sending via the email a photocopy of the document. How to do it right? How to form a document convenient for sending and receiving? What requirements should it meet? You may say that, the solution is obvious – to photograph or scan the necessary paper, save the image on the computer and then attach it to the letter, as a normal attachment. The only problem arises – the impressive size of the resulting file, as modern cameras make photos ranging from 1.5 to 7-9 MB, which is absolutely not suitable for sending by mail. Even more, receiving a large file is very difficult, and sometimes impossible at all with the slow or unstable Internet. Besides that, the transfer of a large image can cause the recipient's mailbox to overflow, after which it will not be able to receive mail at all until the recipient cleans old messages. In addition, a large photo is often impossible to get by using email programs because of the time limit for connecting to the server. A letter with a bulk attachment does not have time to fully load. As a result, the connection is interrupted until the next attempt. And so again and again. The last but not the least, even if the image was obtained, it is so large that it does not fit on the screen entirely, and only a small fragment of it is visible. In either case, the outcome is sad – the recipient cannot receive or see the sent material. And in the worst case, the work of the mail is paralyzed. Here, the understanding of how to resize an image on Mac can be rather useful.

Also, when sending images by the email you should keep in mind the following rules of network ethics:
- • the photo should clearly display the information which you want to give to the recipient;
- • always aim to send a picture as small as possible. Do not send without the need letters with a total attachment of more than 500-700 KB. If there are a lot of attachments, send several letters with several attachments in each;
- • the image should be placed on the screen of the recipient. It is convenient when the photo size is 600-800 pixels (points) along the long side;
- • at the same time, its size will vary from 50 to 120 Kb, which is very convenient both for sending and receiving.
- Next case is the following. Often we store a large volume of different photos on a home computer. However, with a good camera these photos take up a large amount of memory on the hard drive, and not always you need the original photos, so there is some sense in keeping them in a reduced form, which in most cases is not even will be noticeable for the eye, but noticeable in the size of the hard drive. And here again knowing how to resize multiple images will come to rescue.
- The mentioned above case, when photos should be resized to the optimal size because of the rules of the resource where it is supposed to be posted, for instance: a blog, an article, a photo report, etc.
- There are situations when you are required to provide photos of a certain size or upload photos to the resource with the limits of PX (or as it is also known as pixels).
As you see, there are a lot of reasons why to resize images. And bearing the above information, you see, that it plays an important role and to know how to resize multiple images at once can bring even more benefit than resizing images one by one. While resizing the image, you change its resolution. The smaller resolution is, the smaller the size is. In addition, while resizing to a smaller resolution, you can increase image definition that can be rather helpful in some cases.
One can bulk resize images in 2 ways: by changing the algorithm according to which the photo is saved (the smaller the algorithm, the smaller the photo); changing the resolution (the number of pixels) of the photo. Whatever reason for resizing you have, either sending by email, saving space on your hard disk, providing a photo of a certain size or optimal size the question is the following how to choose the right resize image Mac solution?
How to resize multiple images on Mac with ease
Thanks to the technological progress, nowadays there are a lot resize picture Mac solutions available on the market. However, to find the one that will fully meet your requirements is not so simple. Some of them are overpriced, some of them are too shallow or even complicated. The main criteria that we keep in mind while choosing such kind of apps are simplicity in usage and the results obtained by processing the photos.
That is why we recommend you to have a closer look at this straightforward solution developed by Eltima Software – PhotoBulk. The app has a very user-friendly interface and is not overloaded with a lot of buttons and different icons that could appeal to the users with different level of skills. PhotoBulk offers convenient and fast resizing of your photos just with a couple of clicks. The ability to work with photos in bulk can dramatically save your time and ease the tedious work за processing photos one by one. Also, it should be noted that, this minimalistic utility can work with such popular image formats as JPEG, PNG, GIF, BMP, TIFF, and HEIC.

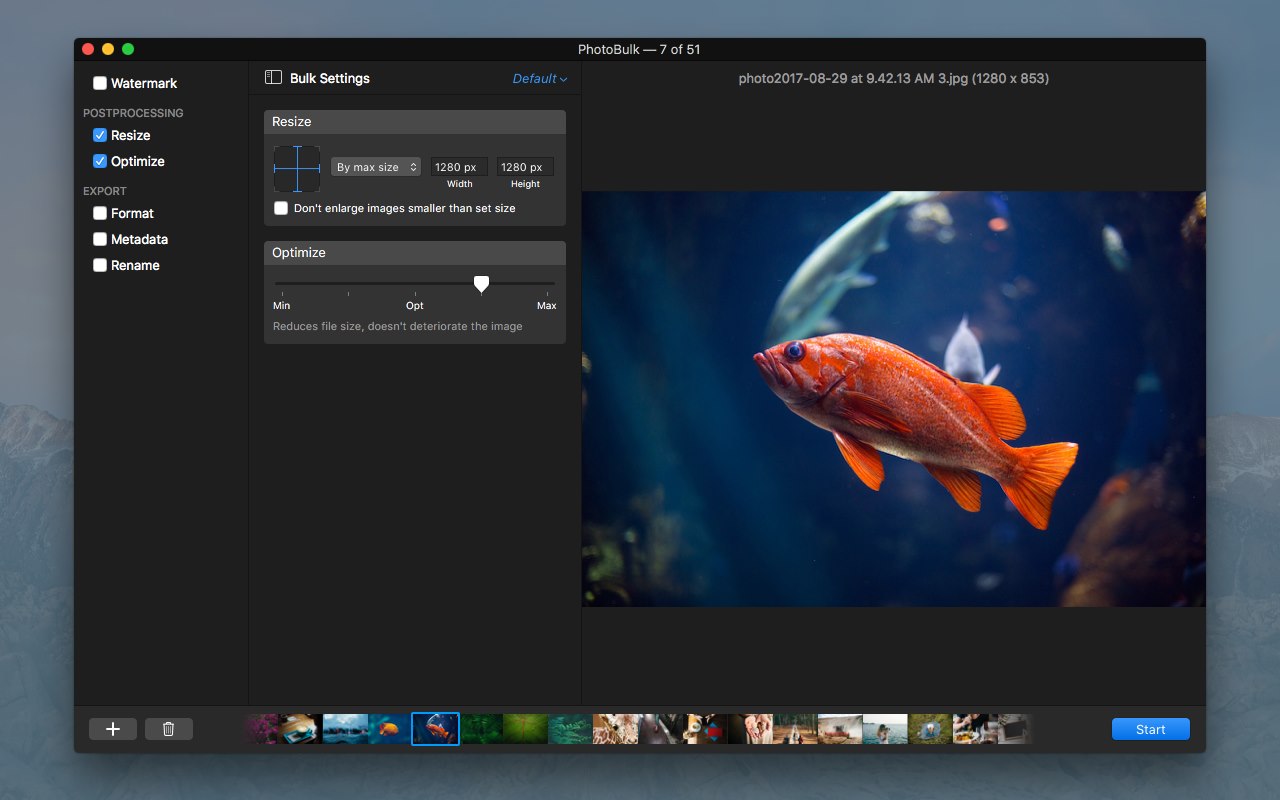
In the current version of PhotoBulk you can choose among 5 parameters in order to resize photo on Mac, namely:
- To resize photos by width. Simply type the desired width into the corresponding field. The height will be automatically calculated according to the provided measurement.
- To resize photos by height. Simply type the desired height into the corresponding field. The width will be automatically calculated according to the provided height.
- To resize photos according to the percentage. Simply indicate the desired percentage value into the corresponding fields. The photo will be scaled in both dimensions at this ratio.
- To resize photos according to free size. Simply type manually the desired width and height. The photo will be resized to the provided parameters without keeping aspect ratio.
- To resize photos by max size. Simply indicate the maximum image width and height. The photo will be resized to be as large as possible while keeping aspect ratio.
Also, this resize picture Mac solution supports the option such as not allowing to enlarge images smaller than the set size. In other words, while resizing photos to a smaller size, if this setting is enabled, the photos that are already smaller than the set size will not be edit. For example, change the dimensions of the photo if its width or height exceeds the geometry specification.
As you have already noticed, with PhotoBulk you can seamlessly resize thousands of photos in a single click without affecting the original images. The app processes the specified images and saves the output images to the selected folder thus leaving the originals untouched and on their own places. Let’s take a closer look at how it works.
The detailed guide on how to resize photos on Mac using PhotoBulk
- In order to start, download PhotoBulk from the Mac App Store.
- After downloading the app, install it on your Mac.
- Once the app is installed, launch it.
- Select the desired number of photos you want to resize and add them to the PhotoBulk editing window. Choose the variant of adding from the list:
- Besides several options of photo adding there are several options for deleting photos, if you have chosen the wrong one accidentally.
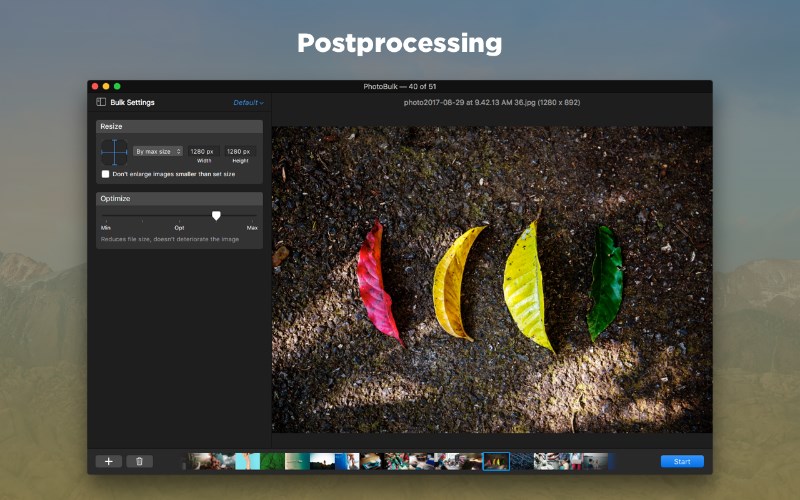
- In order to resize photo on Mac one need to activate Resize option in the sidebar.
- Select the methods of resizing photos from the drop-down list, namely, by width, height, percentage, free size, by max size. Keep in mind to provide the required parameters manually.
- If necessary, activate the option Do not enlarge images smaller than set size.
- Look how the output images will look like in the Preview window.
- If you are satisfied with all the settings and are ready to apply them, click START button.
- Select the path to save the output images in the window that is appeared.
- Click Save button.
- In addition, you can save your resize settings to presets if you do not want to spend a lot of time on making them again by clicking Save As button.
- Set the preset name and happily enjoy the future use of it.

• via the shortcut ⌘O;
• via drag and dropping photos either to the editing window or to the application icon in the Dock;
• via using the + icon in the bottom left corner of the main window;
• via selecting File → Open… from the menu bar.
The list of the desired photos will be added to the PhotoBulk’s Gallery and displayed below the preview window.
Besides being an efficient solution for resizing multiple photos, Photobulk can boast about other interesting and useful features. While resizing photos in PhotoBulk, you can also make them more unique by adding a watermark. The current version offers 4 types of watermarks. Select, apply, combine, it is all up to you how many of them will be on the photo: one, two or all four. And if you think that it is all the features, then you are wrong. PhotoBulk also works as an excellent image optimizer, image converter (supports 5 popular output formats) as well as bulk photo renamer. The app perfectly gathered all the most desired features, check it out and assure yourself that there are no difficulties when you want to resize photo on Mac.
PhotoBulk
Version 2.7.344 (7 Apr, 2025) Release notes
Category: Utilities